Repairing the rammed earth doghouse
- Scarlett Lee

- Jul 17, 2021
- 3 min read
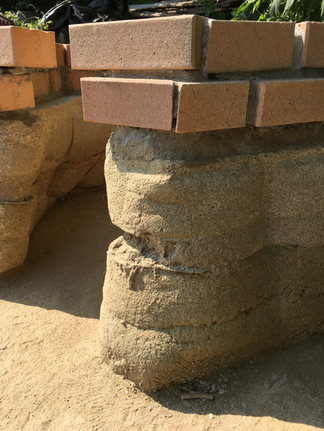
After completing the phase 1 construction of the rammed earth doghouse in October 2020, there have been three changes – bricklaying, erosions, and repairing. The heavy erosion that occurred after rainfalls was not expected though, it was a good chance for me to reassess where stabilisation is required and learn a repairing process.
I resumed a construction by starting bricklaying on the rammed earth wall. Before the construction, I created a digital modelling with Rhino. The exact size of bricks was cut based on the measurement of modelling to create a hexagonal shape when they are laid.

The bricks on the rammed earth wall not only perform slowing down the speed of rainwater flowing on the rammed earth wall but also provide a platform for fabric formwork for the phase 2 construction.


Not too long after finishing bricklaying, rains fell heavily on 30 May and the unstabilised rammed earth layer of the entrance was severely eroded up to the depth of 35mm. The erosion was becoming more worse as my dog was rubbing it. There might be several factors that caused the erosion. Because the wall is tilted inwards, so rains fallen from above stagnated in the unstabilised rammed earth layer not being drained because the layer was protected by a damp-proofing course just below. Another factor might be the location of the unstabilised layer. I think that the entrance part should have been stabilised as it is the most exposed and touched part as my dog keeps going in and out.

Therefore, I decided to repair the wall. I did a soil test first. Because I failed to control a moisture content when I made an earthen mixture in the phase 1, although I did a ball-dropping test, I needed to know an optimal ratio between soil and sand. After the test, it turned out that 1 part soil to 2 parts sand is the optimal ratio when the earthen mixture is the most densely compacted. (In the phase 1, I used a ratio of 2 parts soil to 3 parts sands, which means I used less sands for the mixture in the previous construction.)


For repair, the earthen mixture is prepared with the ratio of soil (5) : sand (10) : lime (2). After making the repairing part wet with some water using a brush, I applied lime-stabilised earthen layers and pressed them hard with fingers. To prevent further erosion on the unstabilised layer, I applied the limes-stabilised mixture to all of the layer. The repairing process was very simple and easy. If the wall were straight, the repaired part would be very noticeable making the whole structure defective. However, the undulated rammed earth form created by fabric formwork made the structure look natural even after it was repaired.


Soon after repairing the wall, a heavy rainfall season has started in South Korea. The rammed earth house have been left in an extreme condition being exposed to heavy rainfalls most of time. The structure looks sound, but the colour has started to turn green because of algae - the rammed earth's rough texture and damp condition was a perfect habitat for them. As you can see in the image, the layer below a damp-proof course has turned green.


Therefore, I did a second repair. After removing the greened surface with a steel wire brush, I applied used oil (perilla oil) on all over the wall and foundation to protect the wall from the penetration of rainfalls and the growing of vegetations. While doing the job, I was concerned if the good smell of the perilla oil would attract any bugs, but thankfully that did not happen. The doghouse was well repaired leaving a tasty smell on the house.


I am currently working on fabricating the fabric formwork for the Phase 2 construction and designing a roof. As I am trying to minimise any industrial materials using locally sourced materials with sustainable design, design process usually takes longer than fabrication process as the design keeps changing based on the research.
Follow my Instagram or Facebook Page for the update.


Comments